Todo App With Settings Example - Android
In this example, let's see how we can build an application with multiple screens. Ideally, we would have a single state for related screens, but for didactical reasons, they are different in this example. (Check the Todo app with settings application source code on GitHub).
The first screen of our app has a to-do list and a button to go to the settings screen, which has options for theming the list.
These are the states for both screens:
// State for the list
public class TodoList {
    private final List<TodoItem> items;

    TodoList(List<TodoItem> items) {
        this.items = new ArrayList<>(items);
    }

    List<TodoItem> getItems() {
        return new ArrayList<>(items);
    }
}

// State for the settings
public class TodoSettings {

    private final int backgroundColor;
    private final int textColor;

    public TodoSettings(int backgroundColor, int textColor) {
        this.backgroundColor = backgroundColor;
        this.textColor = textColor;
    }

    public int getBackgroundColor() {
        return backgroundColor;
    }

    public int getTextColor() {
        return textColor;
    }
}
Based on the states, these are the Actions available in the app:
//Actions for the list
static final String ADD_ITEM = "ADD_ITEM";
static final String DELETE_ITEM = "DELETE_ITEM";
static final String MOVE_ITEM = "MOVE_ITEM";
static final String TOGGLE_ITEM = "TOGGLE_ITEM";

//Dispatched to add a new todo item
static Action addAction(String itemTitle) {
    return new Action<>(ADD_ITEM, itemTitle);
}

//Dispateched to delete a todo item
static Action deleteAction(int itemIndex) {
    return new Action<>(DELETE_ITEM, itemIndex);
}

//Dispateched to change the position of a todo item in the list
static Action moveAction(Pair<Integer, Integer> indexesToMove) {
    return new Action<>(MOVE_ITEM, indexesToMove);
}

//Dispatched to toggle the todo item as completed
static Action toggleAction(int itemIndex) {
    return new Action<>(TOGGLE_ITEM, itemIndex);
}

//Actions for the settings
static final String CHANGE_BACKGROUND_COLOR = "CHANGE_BACKGROUND_COLOR";
static final String CHANGE_TEXT_COLOR = "CHANGE_TEXT_COLOR";

//Dispatched to change the background color of the list
static Action changeBackgroundColorAction(int backgroundColor) {
    return new Action<>(CHANGE_BACKGROUND_COLOR, backgroundColor);
}

//Dispatched to change the text color of the list
static Action changeTextColorAction(int textColor) {
    return new Action<>(CHANGE_TEXT_COLOR, textColor);
}
Since we have two separate states we also have two separate reducers:
TodoReducerthat reduces the todo list action.SettingsReducerthat reduces the settings screen actions.
// Reduces todos actions and state only
public class TodoReducer extends Reducer<TodoList> {

    @NonNull
    @Override
    public TodoList reduce(@NonNull TodoList oldState, @NonNull Action<?> action) {

        switch (action.getActionType()) {
            case TodoActionFactory.ADD_ITEM: {
                String title = action.getData();
                TodoItem newItem = new TodoItem(title, false);
                List<TodoItem> todoItems = oldState.getItems();
                todoItems.add(newItem);
                return new TodoList(todoItems);
            }

            case TodoActionFactory.DELETE_ITEM: {
                int index = action.getData();
                List<TodoItem> todoItems = oldState.getItems();
                todoItems.remove(index);
                return new TodoList(todoItems);
            }

            case TodoActionFactory.MOVE_ITEM: {
                final Pair<Integer, Integer> data = action.getData();
                int from = data.first;
                int to = data.second;
                List<TodoItem> todoItems = oldState.getItems();
                TodoItem itemToMove = todoItems.remove(from);
                todoItems.add(to, itemToMove);
                return new TodoList(todoItems);
            }

            case TodoActionFactory.TOGGLE_ITEM: {
                int index = action.getData();
                List<TodoItem> todoItems = oldState.getItems();
                TodoItem itemToToggle = todoItems.remove(index);
                TodoItem toggledItem =
                        new TodoItem(itemToToggle.getTitle(), !itemToToggle.isCompleted());
                todoItems.add(index,toggledItem);
                return new TodoList(todoItems);
            }

            default: {
                return oldState;
            }
        }
    }

    @NonNull
    @Override
    public TodoList getInitialState() {
        return new TodoList(new ArrayList<TodoItem>());
    }
}

// Reduces settings actions and state only
public class SettingsReducer extends Reducer<TodoSettings> {

    @Nullable
    @Override
    public TodoSettings reduce(@NonNull TodoSettings oldState, @NonNull Action<?> action) {
        switch (action.getActionType()) {
            case SettingsActionFactory.CHANGE_BACKGROUND_COLOR: {
                int backgroundColor = action.getData();
                int textColor = oldState.getTextColor();

                return new TodoSettings(backgroundColor, textColor);
            }

            case SettingsActionFactory.CHANGE_TEXT_COLOR: {
                int backgroundColor = oldState.getBackgroundColor();
                int textColor = action.getData();

                return new TodoSettings(backgroundColor, textColor);
            }

            default: {
                return oldState;
            }
        }
    }

    @NonNull
    @Override
    public TodoSettings getInitialState() {
        return new TodoSettings(TodoColors.WHITE, TodoColors.BLACK);
    }
}
Now that we defined the states, actions, and reducers, it's time to create the store:
public class TodoApplication extends Application {

    private Store store;

    @Override
    public void onCreate() {
        super.onCreate();

        store = Suas.createStore(new TodoReducer(), new SettingsReducer())
                .withDefaultFilter(Filters.EQUALS)
                .build();
    }

    public Store getStore() {
        return store;
    }
}
Building the UI
We have two screens in our application; the todo screen and the settings screen.
Settings Screen
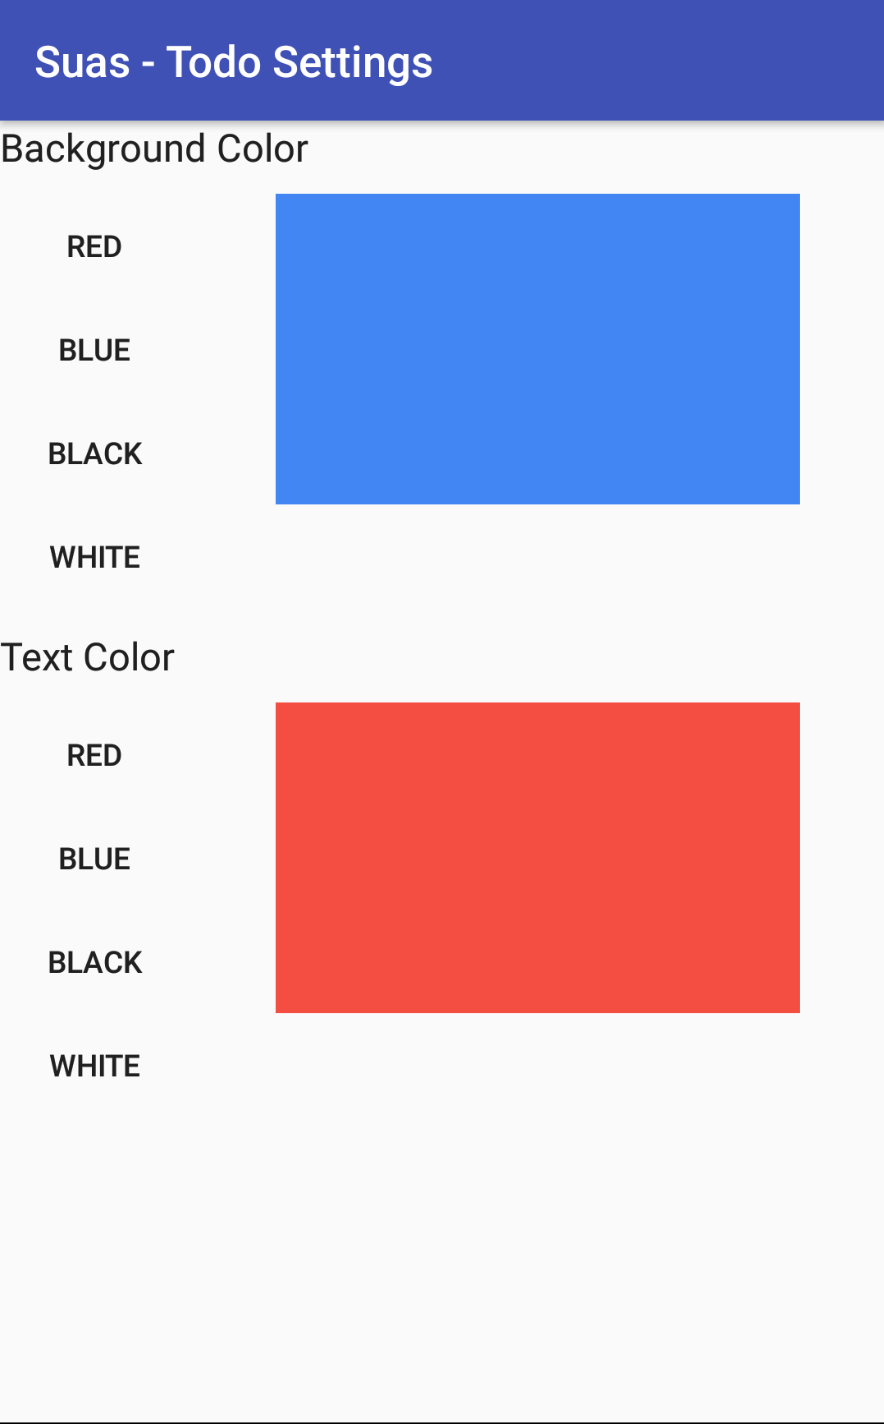
The settings screen looks like the following:

That's the code for SettingsActivity:
public class SettingsActivity extends AppCompatActivity implements Listener<TodoSettings> {

    private Store store;
    private View backgroundColorPreview;
    private View textColorPreview;

    @Override
    protected void onCreate(@Nullable Bundle savedInstanceState) {
        super.onCreate(savedInstanceState);
        setContentView(R.layout.activity_settings);

        backgroundColorPreview = findViewById(R.id.background_color_preview);
        textColorPreview = findViewById(R.id.text_color_preview);

        store = ((TodoApplication) getApplication()).getStore();
    }

    @Override
    protected void onStart() {
        super.onStart();
        store.addListener(TodoSettings.class, this).informWithCurrentState();
    }

    @Override
    protected void onStop() {
        super.onStop();
        store.removeListener(this);
    }

    @Override
    public void update(@NonNull TodoSettings settings) {
        backgroundColorPreview.setBackgroundColor(settings.getBackgroundColor());
        textColorPreview.setBackgroundColor(settings.getTextColor());
    }

    public void selectColor(View colorOption) {
        switch (colorOption.getId()) {
            case R.id.background_black: {
                store.dispatch(SettingsActionFactory.changeBackgroundColorAction(TodoColors.BLACK));
                return;
            }

            case R.id.background_white: {
                store.dispatch(SettingsActionFactory.changeBackgroundColorAction(TodoColors.WHITE));
                return;
            }

            case R.id.background_red: {
                store.dispatch(SettingsActionFactory.changeBackgroundColorAction(TodoColors.RED));
                return;
            }

            case R.id.background_blue: {
                store.dispatch(SettingsActionFactory.changeBackgroundColorAction(TodoColors.BLUE));
                return;
            }

            case R.id.text_black: {
                store.dispatch(SettingsActionFactory.changeTextColorAction(TodoColors.BLACK));
                return;
            }

            case R.id.text_white: {
                store.dispatch(SettingsActionFactory.changeTextColorAction(TodoColors.WHITE));
                return;
            }

            case R.id.text_red: {
                store.dispatch(SettingsActionFactory.changeTextColorAction(TodoColors.RED));
                return;
            }

            case R.id.text_blue: {
                store.dispatch(SettingsActionFactory.changeTextColorAction(TodoColors.BLUE));
                return;
            }

            default: {
                throw new IllegalArgumentException("Invalid option");
            }
        }
    }
}
Let's break the SettingsActivity down:
SettingsActivityis a very simple color picker. It offers color options for background and text and shows what's selected.- First let's get a reference to the
Storein theTodoApplicationduringonCreate(). - Then map the selected color button to an
Actionand dispatch it to the store onselectColor(View colorOption). - Finally, because of
SettingsActivityimplementsListener<TodoSettings>, it's time to show the select color on the screen by handling the current state inupdate(@NonNull TodoSettings settings).
Todo List Screen
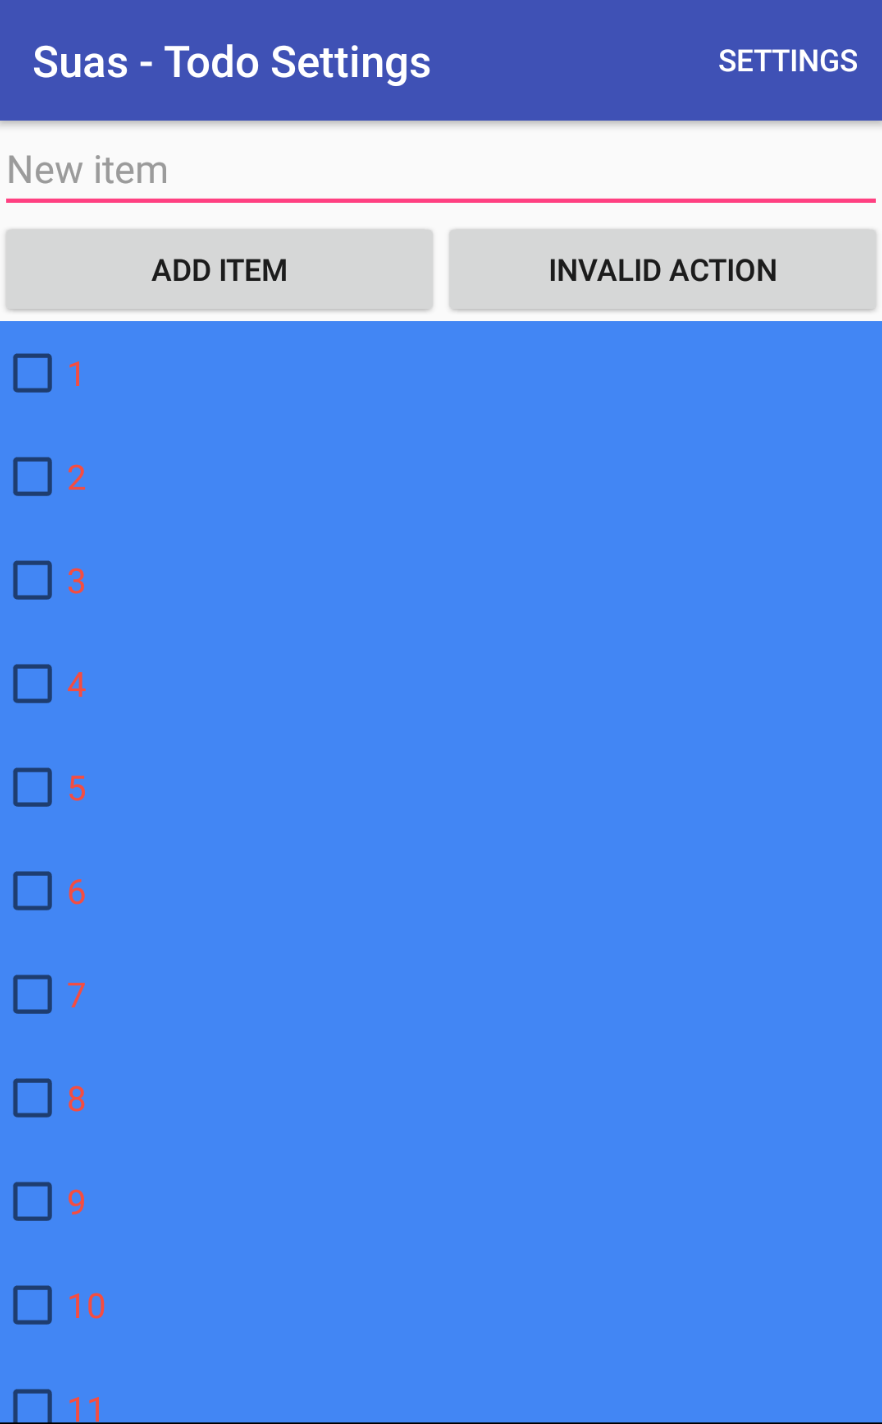
The list screen looks like the following:

Notice that this screen has both states: a list of todo items and settings for them. For this reason, we should subscribe to the whole state of the Store and combine the TodoList and TodoSettings in a single state that can be used by the screen. To achieve this let's create a view model based on both called TodoListViewModel and then implement StateSelector<TodoListViewModel> to generate it.
//View model using both states
class TodoListViewModel {

    private final TodoList todoList;
    private final TodoSettings todoSettings;

    TodoListViewModel(TodoList todoList, TodoSettings todoSettings) {
        this.todoList = todoList;
        this.todoSettings = todoSettings;
    }

    TodoList getTodoList() {
        return todoList;
    }

    TodoSettings getTodoSettings() {
        return todoSettings;
    }
}

//Implementation of StateSelector<TodoListViewModel> on the MainActivity
public class MainActivity extends AppCompatActivity implements StateSelector<TodoListViewModel>,
        Listener<TodoListViewModel> {

    //...
    @Nullable
    @Override
    public TodoListViewModel selectData(@NonNull State state) {
        TodoList todoList = state.getState(TodoList.class);
        TodoSettings todoSettings = state.getState(TodoSettings.class);
        return new TodoListViewModel(todoList, todoSettings);
    }

}
We then register the MainActivity as both: Listener<TodoListViewModel> and StateSelector<TodoListViewModel>:
public class MainActivity extends AppCompatActivity implements StateSelector<TodoListViewModel>,
        Listener<TodoListViewModel> {

    //...
    @Override
    protected void onStart() {
        super.onStart();
        store.addListener(this, this).informWithCurrentState();
    }

    @Override
    protected void onStop() {
        super.onStop();
        store.removeListener(this);
    }
}
And finally, we handle the TodoListViewModel in the update() method:
@Override
public void update(@NonNull TodoListViewModel todoListViewModel) {
    todoListAdapter.update(todoListViewModel);
}
What's Next
Todo app with settings application source code on GitHub
Learn more about Suas listeners
Suas listeners
Using the StateSelector
Adding a listener with a filter
Other sample apps
List of sample applications
Counter App Example
Todo App Example
Search Cities Example
Updated over 6 years ago
