Todo App With Settings Example - iOS
In this example, we show how we can build an application that has multiple screens. While generally, we would have a single state for related screens, in this example, we have different states for each screen. (Check the Todo app with settings application source code on GitHub)
Our app has a todo list screen, that shows the list of todos, and the settings screen that shows the app settings. The states for these screens look like the following:
// Todo Items State
struct TodoList {
  var todos: [String]
}

// Todo Settings State
struct TodoSettings {
  var backgroundColor: UIColor
  var textColor: UIColor
}
We have four actions in our app:
AddTodoActiondispatched in the todos screen when we add a new todo.ChangeTextColorActiondispatched in the settings screen when the todo text color is changed.ChangeBackgroundColorActiondispatched in the settings screen when the todo background color is changed.ChangeTextColorActiondispatched in the settings screen when the todo text color is changed.
// Todo Items Settings
struct AddTodoAction: Action {
  let content: String
}

// Todo Settings Actions
struct ChangeTextColorAction: Action {
  let color: UIColor
}

struct ChangeBackgroundColorAction: Action {
  let color: UIColor
}
Since we have two separate states we also have two separate reducers:
TodoReducerthat reduces the todo list action.SettingsReducerthat reduces the settings screen actions.
// Reduces todos actions and state only
struct TodoReducer: Reducer {
  var initialState = TodoList(todos: [])

  func reduce(state: TodoList, action: Action) -> TodoList? {
    // Handle todos actions only

    if let action = action as? AddTodoAction {
      // Add the todo item
      return TodoList(todos: state.todos + [action.content])
    }

    return nil
  }
}


// Reduces settings actions and state only
struct SettingsReducer: Reducer {
  // Default value is white text on red background
  var initialState = TodoSettings(backgroundColor: .red, textColor: .white)

  func reduce(state: TodoSettings, action: Action) -> TodoSettings? {
    // Handle settings actions only


    if let action = action as? ChangeBackgroundColorAction {
      return TodoSettings(backgroundColor: action.color, textColor: state.textColor)
    }

    if let action = action as? ChangeTextColorAction {
      return TodoSettings(backgroundColor: state.backgroundColor, textColor: action.color)
    }

    return nil
  }
}
Now that we defined the states, actions, and reducers, it's time to create the store:
// Store
let store = Suas.createStore(reducer: TodoReducer() + SettingsReducer())
Notice how we combined the reducers by adding them with the + operator when calling createStore.
Building the UI
We have two screens in our application; the todo screen and the settings screen.
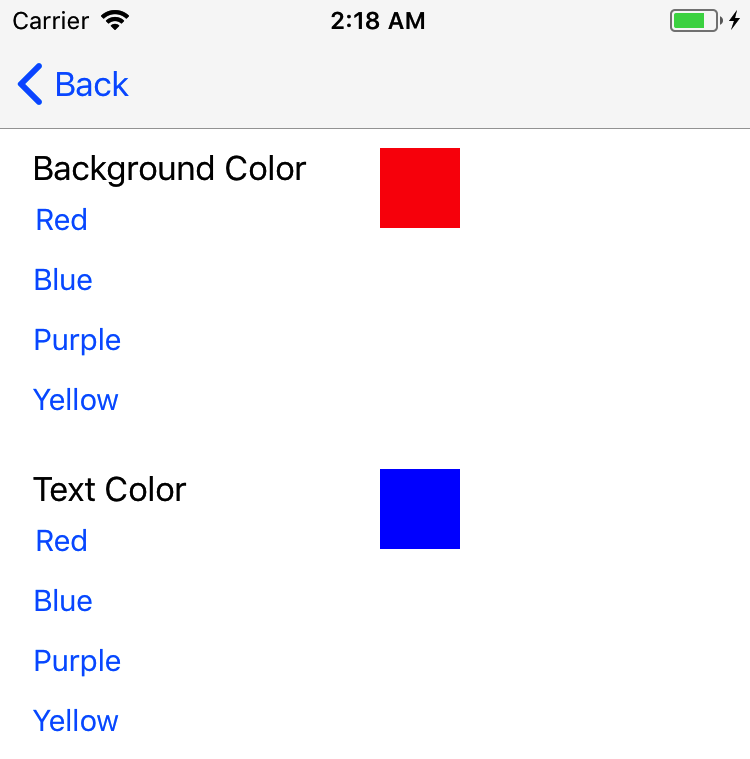
Settings Screen
The settings screen looks like the following:

The view controller for the settings screen is listed bellow:
class SettingsViewController: UIViewController {

  @IBOutlet weak var backgroundColorView: UIView!
  @IBOutlet weak var textColorView: UIView!

  override func viewDidLoad() {
    super.viewDidLoad()

    let subscription = store.addListener(forStateType: TodoSettings.self) { [weak self] state in
      // Notice that we capture self weakly to prevent strong memory cycles

      self?.backgroundColorView.backgroundColor = state.backgroundColor
      self?.textColorView.backgroundColor = state.textColor
    }

    subscription.linkLifeCycleTo(object: self)
    subscription.informWithCurrentState()
  }

  @IBAction func redBackgroundColor(_ sender: Any) {
    store.dispatch(action: ChangeBackgroundColorAction(color: UIColor.red))
  }

  @IBAction func blueBackgroundColor(_ sender: Any) {
    store.dispatch(action: ChangeBackgroundColorAction(color: UIColor.blue))
  }

  @IBAction func purpleBackgroundColor(_ sender: Any) {
    store.dispatch(action: ChangeBackgroundColorAction(color: UIColor.purple))
  }

  @IBAction func yellowBackgroundColor(_ sender: Any) {
    store.dispatch(action: ChangeBackgroundColorAction(color: UIColor.yellow))
  }

  @IBAction func redTextColor(_ sender: Any) {
    store.dispatch(action: ChangeTextColorAction(color: UIColor.red))
  }

  @IBAction func blueTextColor(_ sender: Any) {
    store.dispatch(action: ChangeTextColorAction(color: UIColor.blue))
  }

  @IBAction func purpleTextColor(_ sender: Any) {
    store.dispatch(action: ChangeTextColorAction(color: UIColor.purple))
  }

  @IBAction func yellowTextColor(_ sender: Any) {
    store.dispatch(action: ChangeTextColorAction(color: UIColor.yellow))
  }
}
Let's break the SettingsViewController down:
- In the
viewDidLoadwe add a listener that listens for changes in theTodoSettings - We link the lifecycle of our listener by executing
subscription.linkLifeCycleTo(object: self)(when the view controller is deallocated, the listener is removed) - We next make sure that the view is updated with the most recent values of
TodoSettingsstate we have in the store. That is done by callingsubscription.informWithCurrentState(). It is important to callinformWithCurrentStatewhen starting the view controller so that we get the current state value even before any action is reduced. - When any of the buttons are tapped, we dispatch an action with the selected color.
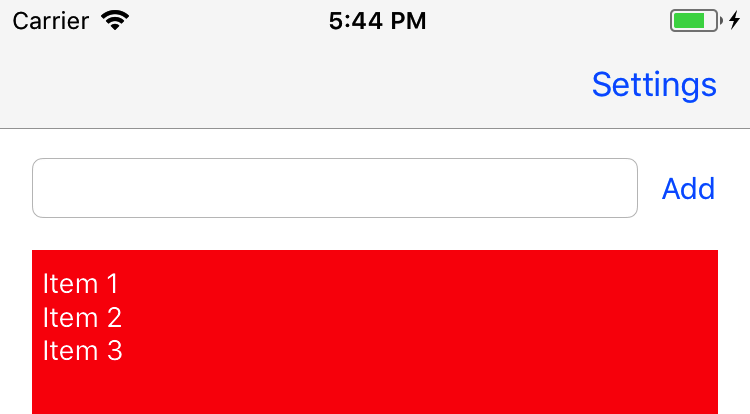
Todo List Screen
The second screen our app contains is the todo list screen. This screen looks like the following:

Notices how this screen depends on both TodoList and TodoSettings;
- It needs
todoslist from theTodoList - It also needs
textColorandbackgroundColorfromTodoSettings.
Since we need values from both states, we will have to add a listener that listens for changes from both these states. There are two solutions described in Using the StateSelector page.
In this example, we will use a state selector. First, we need to define the state that the screen above uses:
struct TodoListControllerSettings {
  var backgroundColor: UIColor
  var textColor: UIColor
  var todoString: String
}
Next, we define our stateSelector function/closure:
let todoListControllorStateSelector: StateSelector<TodoListControllerSettings> = { state in
  guard
    let todoList = state.value(forKeyOfType: TodoList.self),
    let settings = state.value(forKeyOfType: TodoSettings.self) else {

      // If we can get any of them we return nil
      return nil
  }

  return TodoListControllerSettings(backgroundColor: settings.backgroundColor,
                                    textColor: settings.textColor,
                                    todoString: todoList.todos.joined(separator: "\n"))
}
We receive the full Store state in the stateSelector. We pull values from the the Store state by calling value(forKeyOfType:) on it:
state.value(forKeyOfType: TodoList.self)returns theTodoListsubstate from the Store state.state.value(forKeyOfType: TodoSettings.self)returns theTodoSettingssubstate from the Store state.
(Using the State Selector goes in more depth on how to use the `stateSelector)
The state selector finally returns a TodoListControllerSettings with values built from the other two sub states.
Now that we defined our state selector we use it when adding a listener in the TodoViewController:
class TodoViewController: UIViewController {
  @IBOutlet weak var todoTextField: UITextField!
  @IBOutlet weak var todoItemsTextView: UITextView!

  override func viewDidLoad() {

    // Use the state selector
    let subscription = store.addListener(stateSelector: todoListControllorStateSelector) { [weak self] state in
      // Notice that we capture self weakly to prevent strong memory cycles

      self?.todoItemsTextView.text = state.todoString
      self?.todoItemsTextView.textColor = state.textColor
      self?.todoItemsTextView.backgroundColor = state.backgroundColor
    }

    // Link the listener to the current view controller
    subscription.linkLifeCycleTo(object: self)
    )
  }

  @IBAction func addTapped(_ sender: Any) {
    // Dispatch a new action
    store.dispatch(action: AddTodoAction(content: todoTextField.text ?? ""))
    todoTextField.text = ""
  }
}
In the viewDidLoad we add a listener that uses our todoListControllorStateSelector state selector. When any of the TodoList and TodoSettings values are changed. The todoListControllorStateSelector will be invoked with the full State store. This stateSelector creates a TodoListControllerSettings from the full Store state. This TodoListControllerSettings is then passed to the listener callback which uses it to fill the TodoViewController UI components.
What's Next
Todo app with settings application source code on GitHub
Learn more about Suas listeners
Suas listeners
Using the StateSelector
Adding a listener with a filter
Other sample apps
List of sample applications
Counter App Example
Todo App Example
Search Cities Example
Updated over 6 years ago
